Components for Learning – Introducing variants
August 13, 2023
We are proud to introduce a major version of the Components for Learning plugin for Moodle, which brings us variants.
If the previous versions of Components for Learning were intended to simplify the educators’ creating endeavour, variants will provide them with the ability to apply visual variations to the components, like making them full-width, moving them to the left or right, adding quotes or captions, or choosing between ordered or unordered lists.
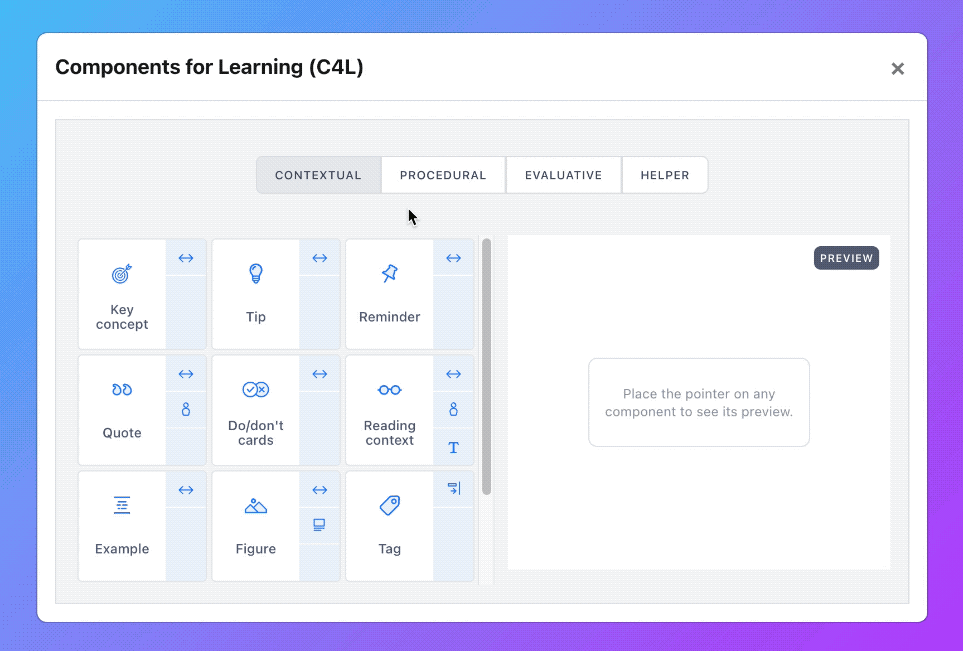
We fully refactored the plugin’s user interface to make sure those variations could be applied without leaving the editor. As you can see, we also adapted the preview display so it shows how the component will look when a variant is selected. Also, If a component allows several variants, you may as well use them together.
To make the experience of creating content easier for educators, we made the user choices persistent: once a Variant is selected, it will remain the preferred option until the user chooses to deselect it again.
This amazing feature has only been possible thanks to Marc’s invaluable contribution and enthusiastic commitment to the project. He explored new lands in the area of the recently implemented Tiny 6 editor, and he might have opened the door to new ways of asynchronously managing user preferences. For the UI and components redesign, I take the blame. 🙂
We hope you enjoy it!
New component – Learning Outcomes
May 9, 2023
You can now use the new Learning Outcomes component in C4L (currently for TinyMCE6 only, but soon available for other versions).
As explained in the Components for Learning site, the new component allows educators to display the expected Learning Outcomes for a learner to be met after completing a course or activity. You can easily add or remove list items with the Delete and Enter keys:
The component can be handy both to display Learning Goals (the overall intended outcomes of a course or program) as well as Learning Objectives (what a learner is expected to gain after engaging in a particular learning activity).
To better understand the component, you may want to check out the Components for Learning site, where you can find a detailed description along with a few examples and use cases.
Setting Components for Learning for Students’ usage in the editor
May 2, 2023
Although Components for Learning (C4L) was created with instructors in mind, the idea of students being able to use it was always widely considered. Now that usage can be more granularly managed (only in Moodle Tiny6 version, at the time) through a simple change in the plugin settings.
This new feature makes special sense in a constructionist learning environment like Moodle. Now learners can benefit from C4L when composing their summaries or even their own version of the materials.
As you can see in the image from the settings section, only contextual components can be made available to learners:
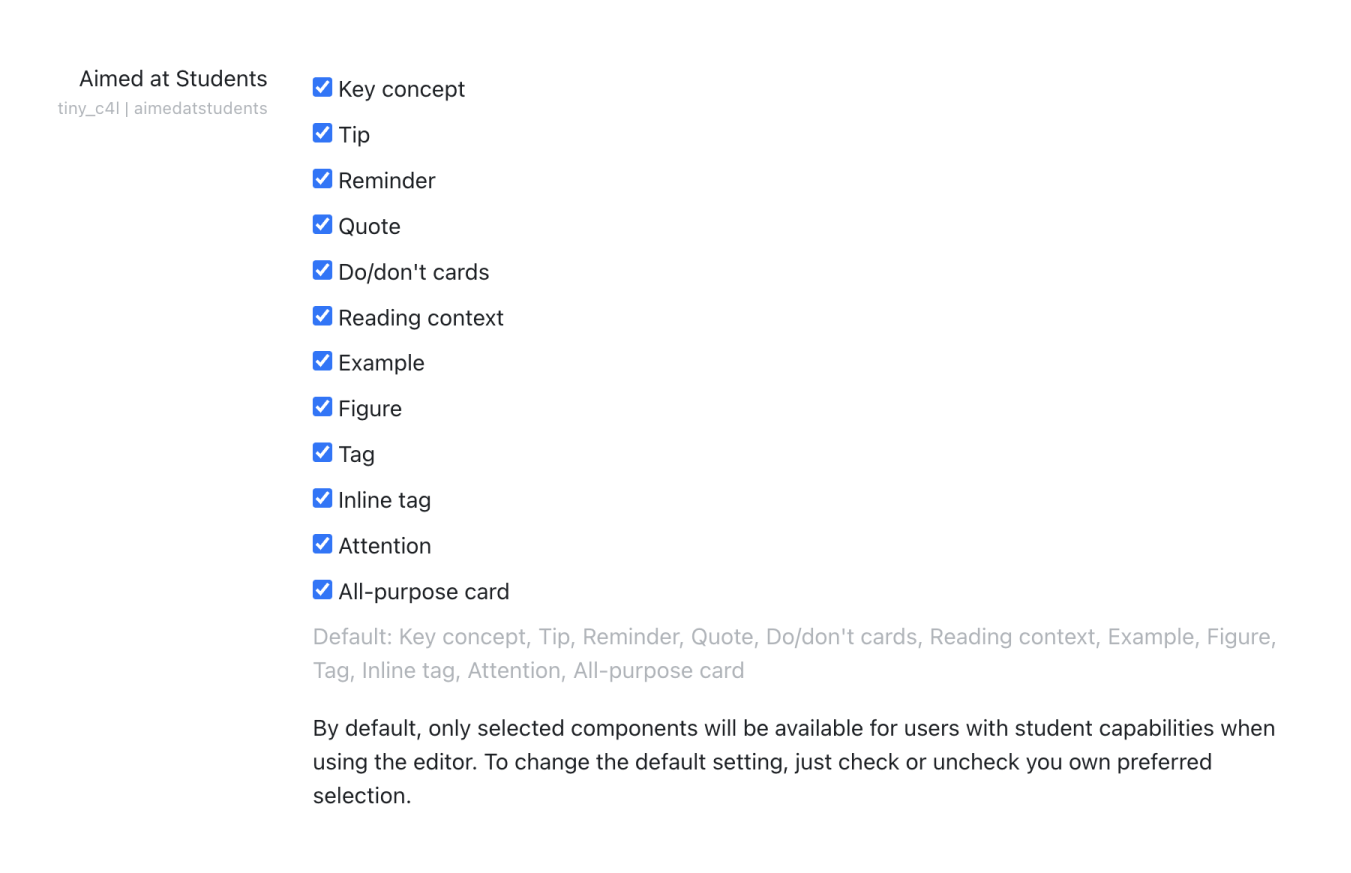
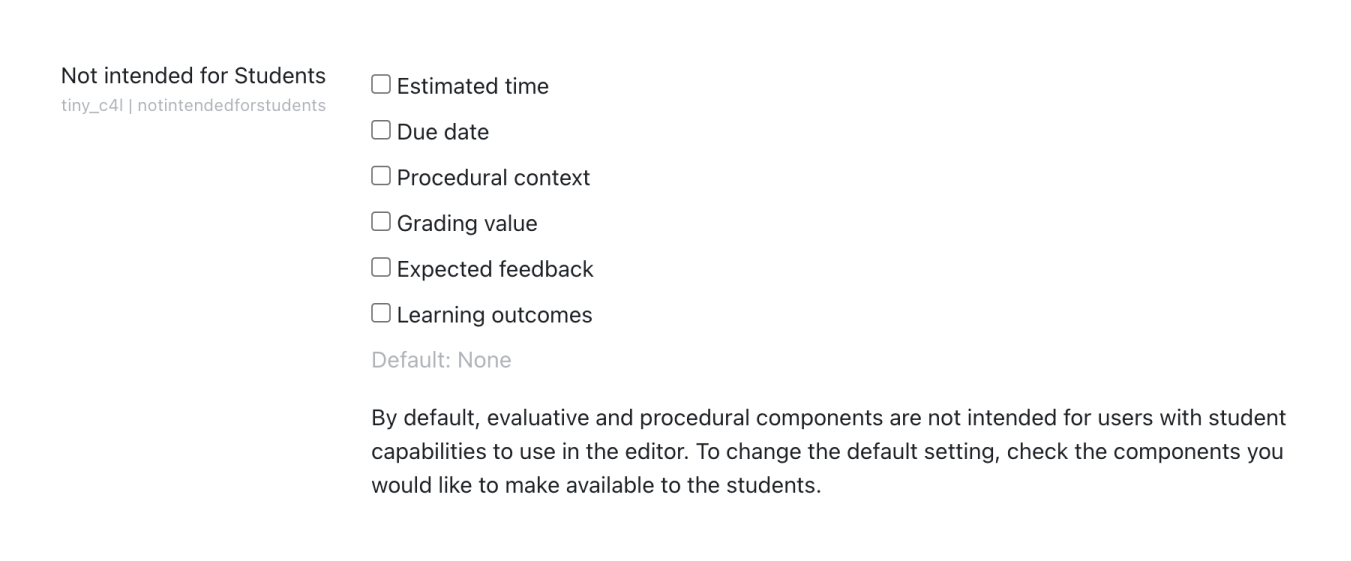
At the time, we couldn’t think of a context where it made sense that users use evaluative o procedural components; but things are never that simple in Learning, so who knows? For now, we’ll stick with the intuitive, most common approach.
Components for Learning WordPress Blocks
January 27, 2023
I’m glad to announce that Components for Learning is already available for WordPress. The plugin was reviewed and approved a few days ago and is now available for download in the wordpress.org public plugins directory.
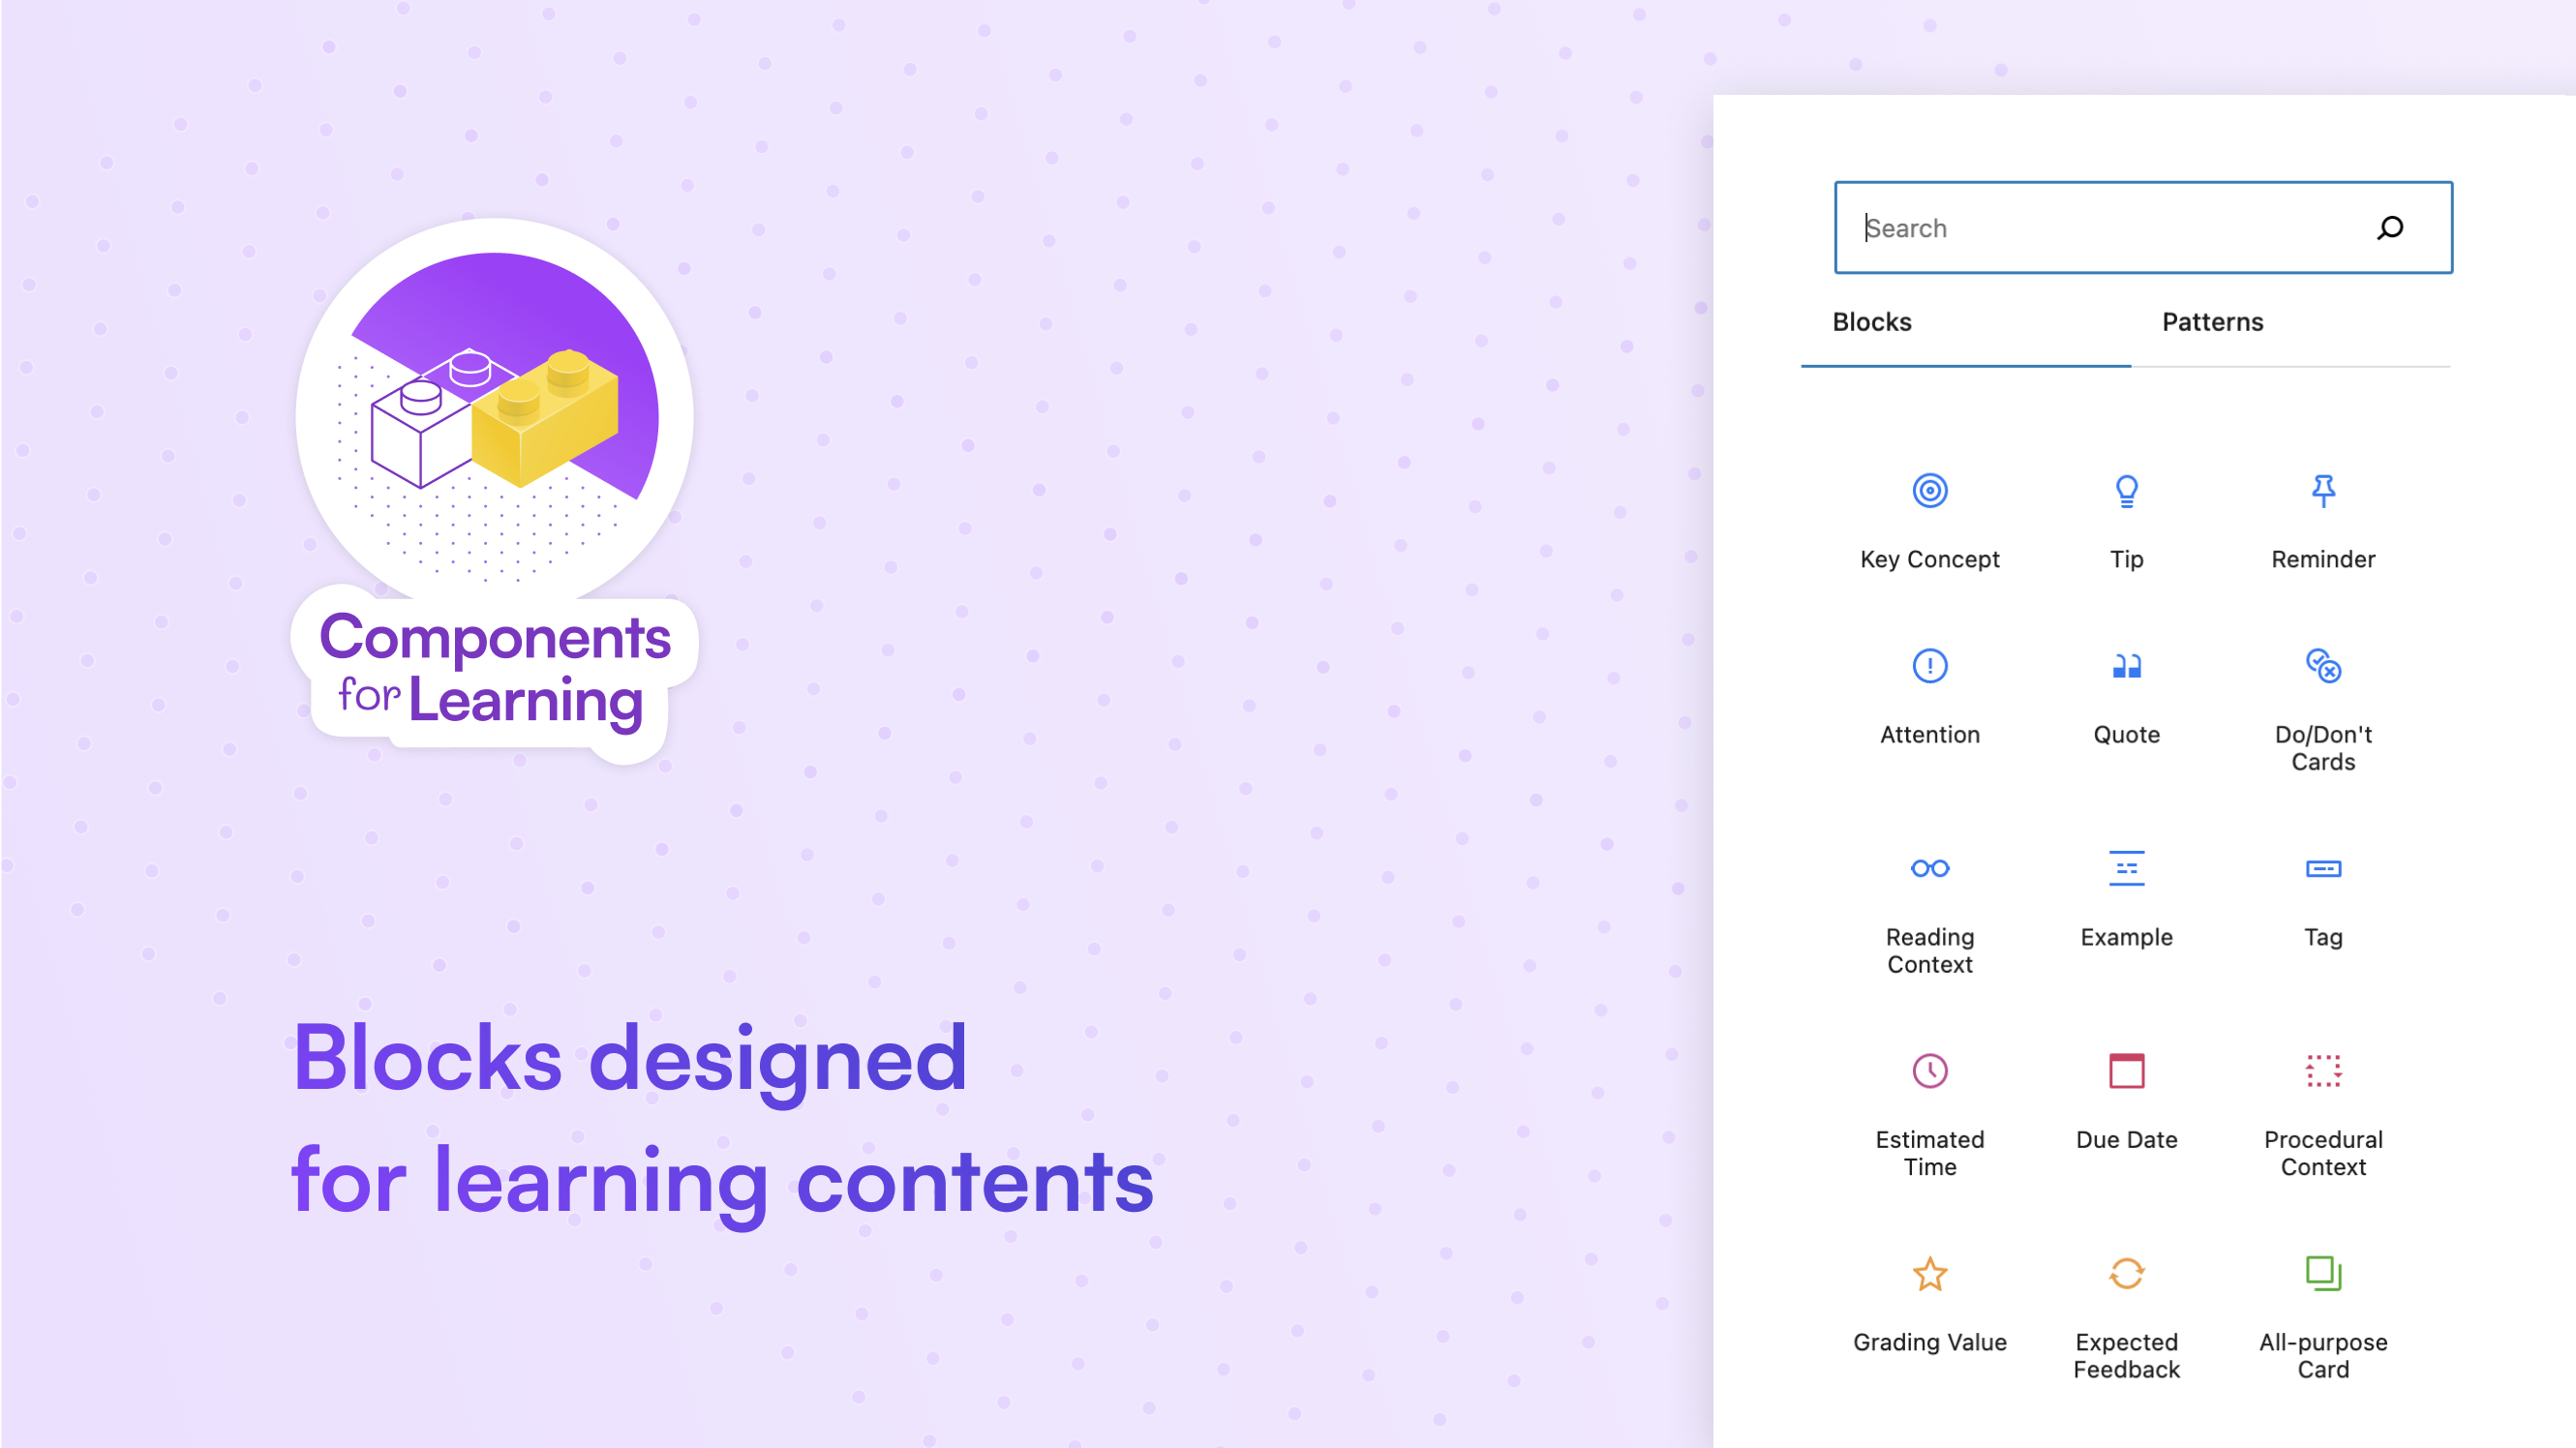
The plugin allows teachers, instructional designers and educators in general to author their content in WordPress, taking advantage of the fantastic features that both the Gutenberg editor and the Site Editor provide. If you haven’t tried it yet, I encourage you to do so!
The WordPress plugin presents minor differences regarding its Moodle counterpart, the most distinguishable being a set of redesigned button icons to fit the built-in editor design consistently:
Also, the Figure component has been omitted in this version as a native Figure block already exists in WordPress; also, the Inline Tag has not yet been implemented as a block as the architecture of the blocks themselves is not (yet?) intended for inline elements.
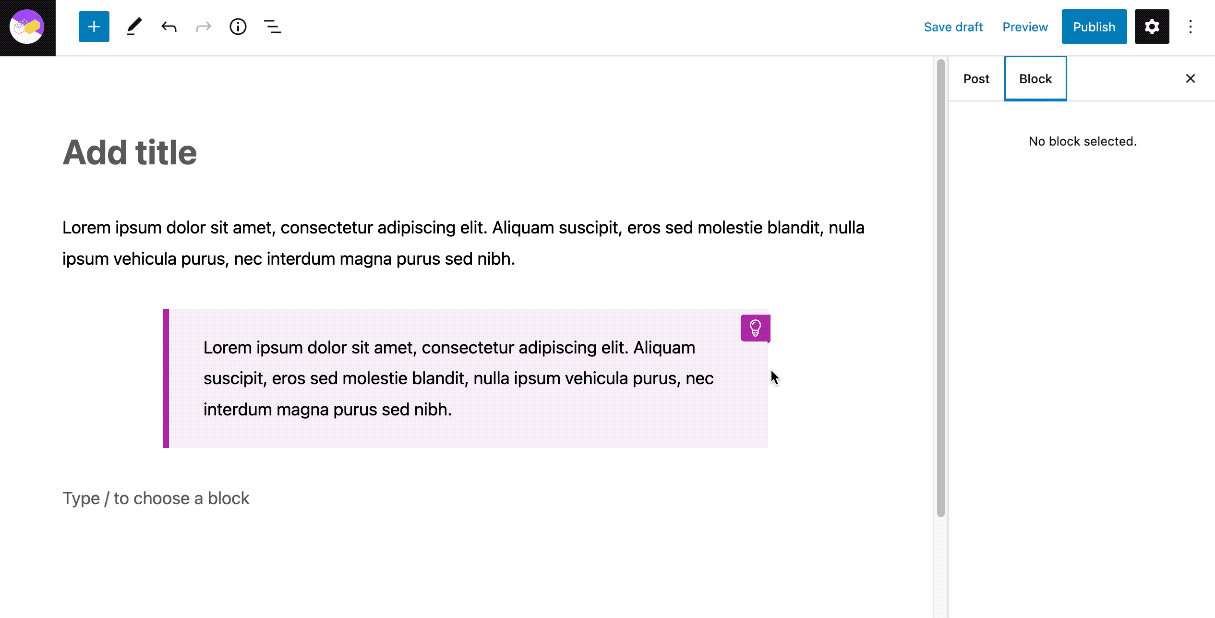
The big advantage of the Gutenberg block system is the simplicity of creating content whilst applying a visual format very similar to the one that will be published. Authors can build rich content with a consistent design without worrying about the visual aspect by having the right components. For instance, adding a Tip can be as easy as that:
The block editor in WordPress also allows adding settings and preferences to the block itself, so it can be more or less customizable depending on its purpose and regarding the amount of control the author is intended to have over the visual design. The current version of the Components for Learning blocks does not include many options yet, being the component width the only property available at the moment:
However, that will likely change in the near future, as I’m willing to implement other built-in properties that are yet available for developers to work with, like nested blocks, variations (blocks sharing common characteristics) or transformations (blocks that can be turned into other blocks). There is a long way ahead to keep experimenting, especially being so many different needs and specific uses in Learning.
Presenting Components for Learning at MoodleMoot’22
January 4, 2023
Last September I had the opportunity to present my new project, Components For Learning, at the MoodleMoot that took place in Barcelona.
Components for Learning is a collection of semantic visual components specifically designed for learning contents, helping reduce the learners’ cognitive load and providing a unified, consistent visual environment out of the box.
I also introduced the free Moodle plugin that allows any user to start using those components very easily in their own learning materials.
Here’s the official recording of the event:
And here’s the transcript:
Hello, and welcome to ‘Create beautiful, balanced learning content with the Components for Learning plugin’. My name is Roger Segú, I’m from Barcelona, and I work as a user experience designer and front-end developer. I specialize in learning environments, meaning I create courses, themes and plugins mainly for learning institutions and mainly with Moodle. (click to display the full transcript)
Also, I’m an instructional designer. I’ve always been. I was an instructional designer way before I learned to code. I know how it feels to have a precise idea for a course and not being able to implement it because you don’t have the tools. I’ve experienced that pain myself.
And that was the reason for me to start learning development in the first place. And so I did it. I learned HTML, then CSS, then JavaScript, then PHP. And it’s been, it’s been quite a 10-year period. And now I finally can safely build my own Moodle themes and plugins.
When I did not have those skills, I always wished that there was some solution that would help instructional developers quickly apply meaningful and balanced design content to their materials with ease and simplicity. So now that I can, I just build it. And I called it Components for Learning.
What is Components for Learning? It’s a free plugin specially designed for Moodle that allows you to use a collection of visual components directly in the editor.
What you see here in this image is the modal window that shows after clicking on the plugin button in the Atto editor. And what for those at the end of the room I’ll take a moment to read them aloud. Those are the Key concept, the Tip, Reminder, Attention, Quote, Do and don’t cards, Reading context, Example, Figure, Tag, Estimated time, Due date, Procedural context, Grading value, Expected feedback, Purpose card, and Inline tag.
So as you can see, all the available components are aimed to meet the educators’ needs. We’ll see more about them later on.
Just tell you that you can find the plugin, obviously for free, in the Moodle Plugins directory and download it and install it through the site administration. And, as you can see, it supports all the latest Moodle versions. And once installed, you can start using it. No other settings needs. Just as simple as that.
Okay, but let’s see in action.
Let’s imagine we are working on this material for our learners. We are in the Atto editor here. And let’s see. We want to give them a tip, and we want it to visually differentiate from the regular text. All we need to do is select the piece of text we want to turn into a tip -it’s this area here- and get it like that. Then, we click on the Components for Learning button, we choose the Tip component, and we replace the placeholder text with the text we just got.
When we save, this is how it displays. As easy as that.
Thank you very much. That was unexpected.
Okay, then let’s do another example. In this case, let’s imagine we want to add a quote to reinforce a particular idea. And for instance, let’s take a fragment from ‘On the origin of species’ by Charles Darwin, on the Gutenberg project in this case. And all we need to do is choose and select the original quote and copy it.
Then again, we click on the Components for Learning button, we choose the Quote component, and we get this. A placeholder text again. We just replace it with the text we copied, and finally, in this case, we have to add the author’s name and the title of the work. And that’s all. Then, just like before, when we save, we have this format already applied.
Our goal here is to provide our learners with a cohesive design for every type of content. The main principle is simple and connects with the fundamentals of design: we always use the same visual components for the same type of content.
That way students will effortlessly learn to identify them and assign every type of content with a single meaning, always the same. And in no time, this meaning will become unconscious for them, the same way we’ll know a small ‘x’ cross at the top right of the corner of a window means closing it, closing a window, or the three lines in a row mean ‘display the menu’ and all this kind of patterns.
And this is how we help reduce the learners’ cognitive load, which is one of the main goals of every instructional designer, as you all know.
In the previous cases, I showed you two examples of contextual components. Contextual components help us assign a meaning to a particular content regarding its context in relation to the main flow. Something exemplifies an idea, or something summarises an idea, something highlights an idea…, this kind of stuff. And those are usually the most common, the most relevant in the learning process.
But there are also two other types of components. I called them Procedural components and also Evaluative components. Procedural components are specifically intended to give students inputs on the learning process they are involved in.
For instance, let’s imagine we want to specify the estimated time a learner can expect to invest in a particular activity. We could place it here, in the rectangle. And again, as before, all we have to do is click the button, choose the corresponding component, and we replace the content of the placeholder text, and that’s it. We save it, and we see it like that.
Finally, let’s take a look at the evaluative components, which I just mentioned a minute ago. Evaluative components are intended to inform the learners about any aspect regarding grading, feedback from the teacher or other related considerations linked to evaluation.
In this case, I’m not going to explain again because it’s always the same: Just copy, click the button, select the component… But just for you to see how it works: Imagine, in this case, we want to provide an expected feedback and we, again, select the text, and all the thing. Here we select the corresponding component, and here we are: this one would be the Expected feedback component. This is how we see it.
At this point of the presentation, it would be relevant to introduce you to the project site. It took me a long time to get it ready, but I finally got it published last week, just in time. On the site you will find a detailed description of the project along with its main goals and characteristics in general. And as you will see there, Components for Learning is an open learning project, meaning that it’s free and that is available for everyone.
The plugin itself is licensed GPL, as the rest of the Moodle core software, and all the contents on the site are freely available under a Creative Commons license.
Also on the site, you can find a guide. That will help you browse through all available components and choose the most suited for every situation. Let’s see an example, a quick example, and I’ll finish.
Let’s say we wanted to use the Key concept in a material, but however we may not be entirely sure. That this is the component we really need for that particular case. So we go and visit the guide, and this is what we find. And as you can see, in this case, our assumption was correct, as highlighting an idea is, in fact, the purpose of the Key concept component.
And we also see there a demo, just before, on how it will display once applied. Most components may have slightly different purposes, so this is important that, I guess, the guide will keep you covered in all this matter.
Also, another interesting feature in the guide is the provision of recommended and discouraged use cases for you and for most of the components. And I must say it’s really interesting because those are based in real user testing, mostly by teachers at Institut Obert de Catalunya -thank you very much!- who have committed to this project and are using a very similar extended collection of those components. So those recommendations were added after detecting some confusing use patterns to help avoid confusions that raise naturally.
And also there was a final aspect in the guide that I find particularly useful, which are real-life examples for every component. As you can see here, you can find them at the bottom of the page. You just need to click on each one to open them in a modal window, like that, and you see that particular piece of example. So it can help you disambiguate and proceed.
And that’s it. Finally, just let you know that this project has just started. And I’m very, very interested in your input as educators. I’d love to know what components do you miss, and any kind of involvement would be more than appreciated. Because this is a living project, it’s just started now. And if you wish to get involved in the project in any way, you will find my contact in the site; it’s roger@componentsforlearning.org. And if you install the plugin I encourage you to follow the Twitter account, @compforlearning, to get updates on new components available or tutorials and also to get in contact and make suggestions.
But also again, I would like to thank all the teachers at IOC, who helped me during the last years, and without them, that would have been impossible. And also I would like to especially thank to Justin Hunt, which plugin Poodll Snippet was used, in this case, to make the base code for this plugin. This is also me, my professional site and my Twitter account.
Thank you very much.
I recently submitted for approval a WordPress plugin for the same project, which hopefully will be available soon and will allow any user of that platform to use the same visual components directly in the Gutenberg block editor.
I’ll keep you up to date!